OBJECTIVES
Upon completion of this lesson, you will become familiar with:
- List three factors that you must determine before lifting a load.
- List and describe three methods for lifting a load.
- Define a lever, its three components and the three classes of a lever.
- List at least three applications of the hoist.
- List two types of cribbing used to stabilize a load.
- List the five steps to build cribbing for lifting and stabilizing a load.
- List the steps to roll a load using pipes.
- Demonstrate in two practical stations the techniques for lifting, stabilizing and rolling loads.
Before Lifting or Moving a Load
The following factors must be examined before lifting or moving a load:
- Weight of the load
Determine the exact weight to ensure proper equipment selection (e.g., levers, jacks, or cribbing).
Overestimating prevents equipment failure or instability during lifting/moving.
- Consequences when the load is moved (what will happen)
Assess stability shifts (e.g., rolling, tipping, or collapsing) to prevent sudden hazards.
Identify secondary risks like pinched limbs, structural stress, or unbalanced forces.
- Selection of the method for lifting or moving the load
Choose based on load weight, shape, and environment (e.g., lever for small lifts, hydraulic jack for heavy loads).
Ensure the method provides stability and control (e.g., cribbing for support, rollers for horizontal movement).
Methods for Lifting Loads
The Lever
The lever is the simplest method for lifting a load. A lever is a rigid bar, either straight or bent, that is free to move on a fixed point called a fulcrum.
The fulcrum is the object or place that supports the load when a lever is used to move another object.
Applications of levers:
- To move a load that is too heavy to move by hand
- Pulling / hauling
- Raising
There are three components that make-up a lever: fulcrum, load, and force.
Fulcrum:
- The fixed pivot point on which the lever rotates or balances.
- Acts as the support that enables the lever to multiply input force (e.g., a rock under a pry bar).
Load:
- The object or resistance being moved or lifted by the lever.
- The weight or force exerted by the object (e.g., a trapped vehicle or heavy debris).
Force:
- The effort applied to the lever to move the load (e.g., pushing/pulling on a pry bar).
- Can be increased by adjusting the lever’s length or fulcrum position.
Three Classes of Levers
Levers are divided into three classes based on where the fulcrum is located in relation to both the load and force.
Class One Lever: The fulcrum is placed between the force and the load, which provides the greatest mechanical advantage when lifting a load vertically. You can increase the mechanical advantage by using a longer lever.
Examples:
- Crowbar/Pry Bar: Fulcrum (pivot point) is placed under the bar, force is applied to one end to lift a load (e.g., heavy object or debris).
- Seesaw: Fulcrum is the central pivot, with force (a person’s weight) on one side lifting the load (another person) on the other.
- Scissors: The hinge acts as the fulcrum, force is applied to the handles, and the load (material being cut) is at the blades.

Class Two Lever: The load is placed between the force and the fulcrum. This is the most useful and efficient lever for moving objects horizontally.
Examples:
- Wheelbarrow: The wheel acts as the fulcrum, the load (e.g., dirt or tools) is in the tray, and force is applied to the handles to lift.
- Bottle Opener: The fulcrum is the edge of the cap, the load is the lid being pried up, and force is applied to the handle.
- Nutcracker: The fulcrum is the hinge, the load (nut) is placed in the middle, and force is applied to the handles to crack it.
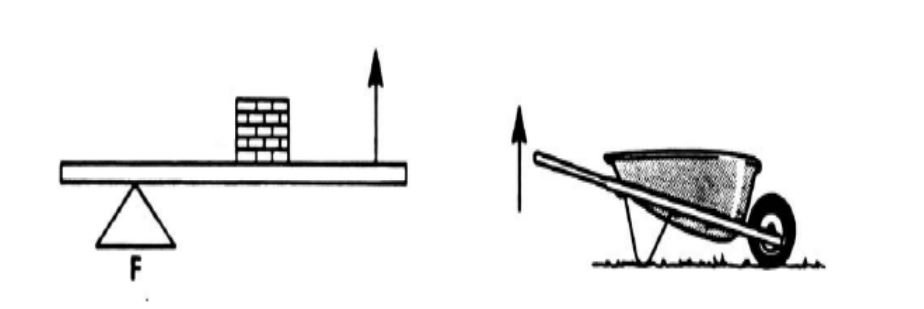
Class Three Lever: The force is placed between the load and the fulcrum. This type of lever is used when force may be sacrificed for distance, and reduces mechanical advantage.
Examples:
- Fishing Rod: The fulcrum is your forearm (elbow), force is applied by your hand in the middle, and the load (fish resistance) is at the line end.
- Tweezers/Tongs: The fulcrum is the pivot point, force is applied by fingers in the middle, and the load (object being gripped) is at the tips.
- Human Arm (bicep curl): The elbow acts as fulcrum, force is applied by muscles (bicep) between elbow and hand, and the load (weight) is in the hand.
The Come-Along
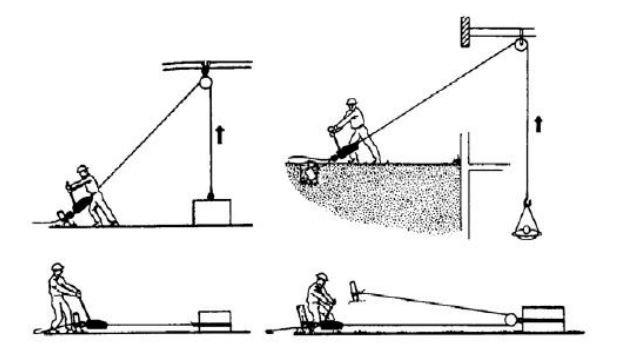
The come-along provides mechanical advantage for lifting and pulling using a lever and gear ratcheting system. It consists of an anchor hook on one end and another hook attached to a retractable chain or steel cable.
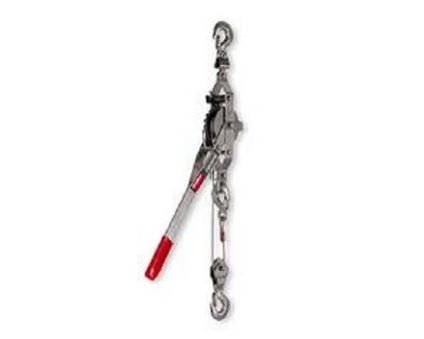
The following figure shows the many uses of the come-along.
Hydraulic Jacks
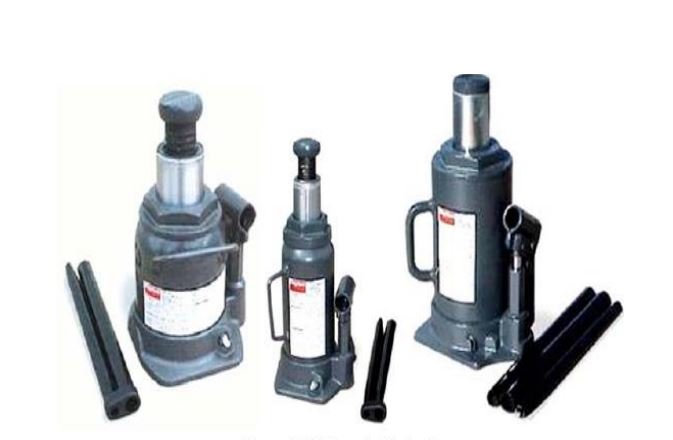
These devices are operated with a lever to apply hydraulic pressure to a ram. Hydraulic jacks are used primarily for lifting heavy loads. Though they usually have only a short reach, they are extremely powerful – a hand-operated bottle jack can lift as much as 50 tons. It is important to keep the hydraulic jack perpendicular to the ground – the jack is not designed to handle lateral loads.
Using Cribbing to Stabilise Loads
Cribbing: The construction of a stable platform using wood pieces, which is used to stabilise and support loads.
Cribbing is constructed of 10 x 10 cm -sized wood pieces arranged as a column to support the weight of an object. Shims are used to fill in small spaces and secure the object in its position as it is being lifted. Shims are also used to change the angle of thrust in order to achieve optimum contact with uneven or sloping surfaces.
Failure of a wood cribbing system is slow and noisy as the wood fibres are crushed. This usually provides ample warning of impending failure for rescuers.
The requirements for improvised cribbing are:
- The material must be flat on both surfaces
- The material must be able to withstand the weight of the object being supported.
Examples include: Furniture, bricks, concrete blocks, tires, and rims.
Types of Cribbing
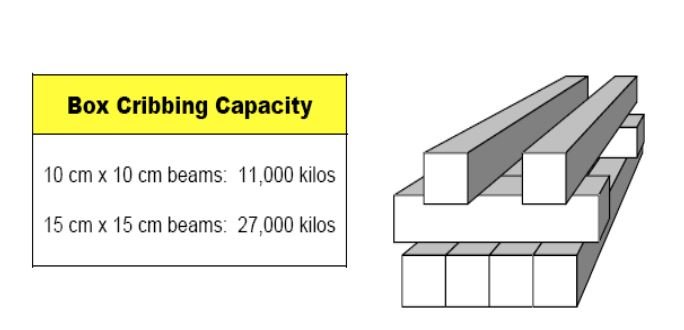
BOX: Built with wood blocks in a square configuration, using two parallel blocks per layer. Layers are set at 90 degrees to each other with the ends of the wood blocks overlapping each other by 10 cm. The box crib has an open centre.
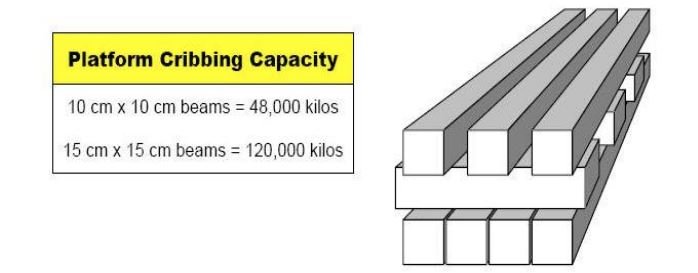
PLATFORM (cross-tie): Built with wood blocks in solid layers of three or more wood pieces each. Layers are set 90 degrees to each other. Little or no space is left between the wood pieces. The ends of the wood pieces must also overlap each other by 10 cm.
General Guidelines for Cribbing
- The first layer should be solid to fully distribute the load, especially on softer surfaces, such as soil and asphalt.
- Height limit: The general rule is to limit cribbing to three times the width of the pieces of wood being used for cribbing (3:1 height-towidth ratio). For example, if the pieces of wood are one metre wide from one side of the first crib to the outer side of the last crib (across), the cribbing should not exceed three metres in height.
- Always overlap corners by approximately 10 cm. This prevents splitting off corners of individual pieces, which can affect overall stability.
3.3 Procedure for Lifting and Stabilising a Load
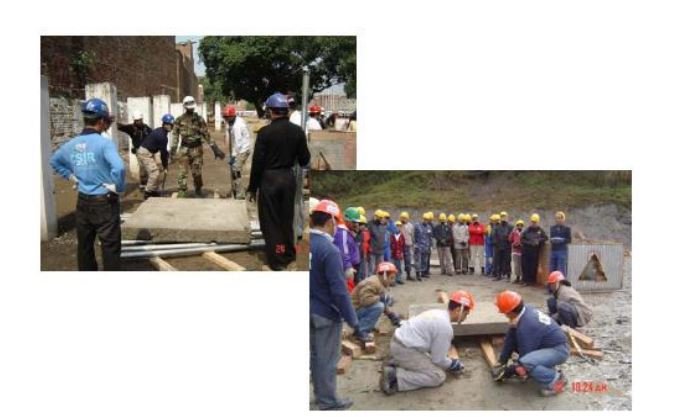
This procedure consists of gradually lifting the target object or load and inserting one layer of cribbing after another until sufficient clearance and stability are obtained. Make sure to use full PPE before starting any work.
- Make an initial opening using a shims or similar tool.
- Set up a lever system with the pry bar.
- Lift the load gradually to create an opening large enough to set up the first layer of cribbing under it. Use wedges to prop up the load gradually as you are lifting; if the pry bar slips or breaks, this will prevent the load from dropping any distance. It is not necessary to lift the full height of the next layer of cribbing all at once.
- Raise the fulcrum, raise the load again, and set up the next level of cribbing with the wood pieces at 90 degrees to the previous layer.
- Reposition and raise the fulcrum and continue to raise the load until enough clearance is obtained to extricate the victim safely.
Safety Measures for Cribbing
- “Lift an inch, crib an inch.”
- Never place hands beneath a load while cribbing!
- For maximum stability, the height cribbing should not exceed three times the width of the cribbing blocks (3:1 ratio).
Rolling a Load
You can use metal tubes to roll heavy loads instead of lifting them. Follow the simple steps below using the picture as a guide.
- Raise the load slightly using a Class One lever, just enough to slide three metal tubes underneath it (use the lifting technique for cribbing).
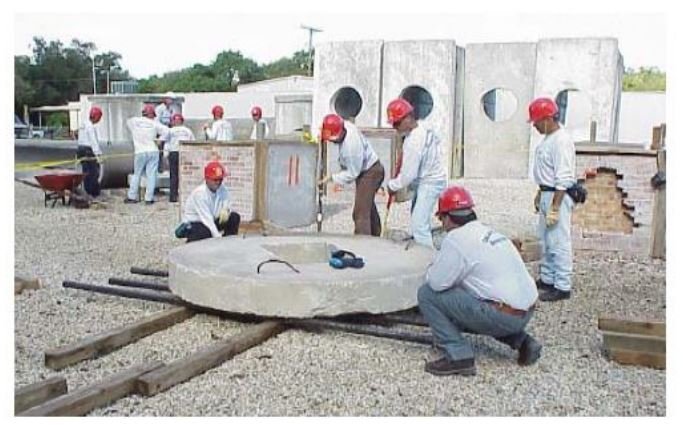
- Using Class Two levers, push the load in the desired direction. The tubes may be fanned to turn the load as it rolls.
Final Summary:
Mastering load-handling techniques is essential for both safety and efficiency in rescue and construction work. By understanding leverage principles, proper cribbing methods, and equipment like come-alongs and hydraulic jacks, you can tackle heavy loads with confidence. Remember: always assess weight, stability risks, and method suitability before acting. “Lift an inch, crib an inch” isn’t just a mantra it’s a lifesaver.
Whether rolling pipes or building platforms, prioritize gradual, controlled movements and strict adherence to safety ratios. Now, take these skills to the field and practice until precision becomes second nature.

Emma Lee, an expert in fire safety with years of firefighting and Rescuer experience, writes to educate on arescuer.com, sharing life-saving tips and insights.
