OBJECTIVES
Upon completion of this lesson, you will become familiar with:
- Define Rope Rescue and types of Technical Rope Rescue.
- List the equipment used in Rope Rescue Techniques.
- Describe the Rope Work and Techniques i.e. Belay Rappelling, Ascending / Descending, Hook Ladder, Basket Stretcher and Depth Rescue.
- Describe the important safety reminders and Dozens of Human Errors.
1. Rope Rescue
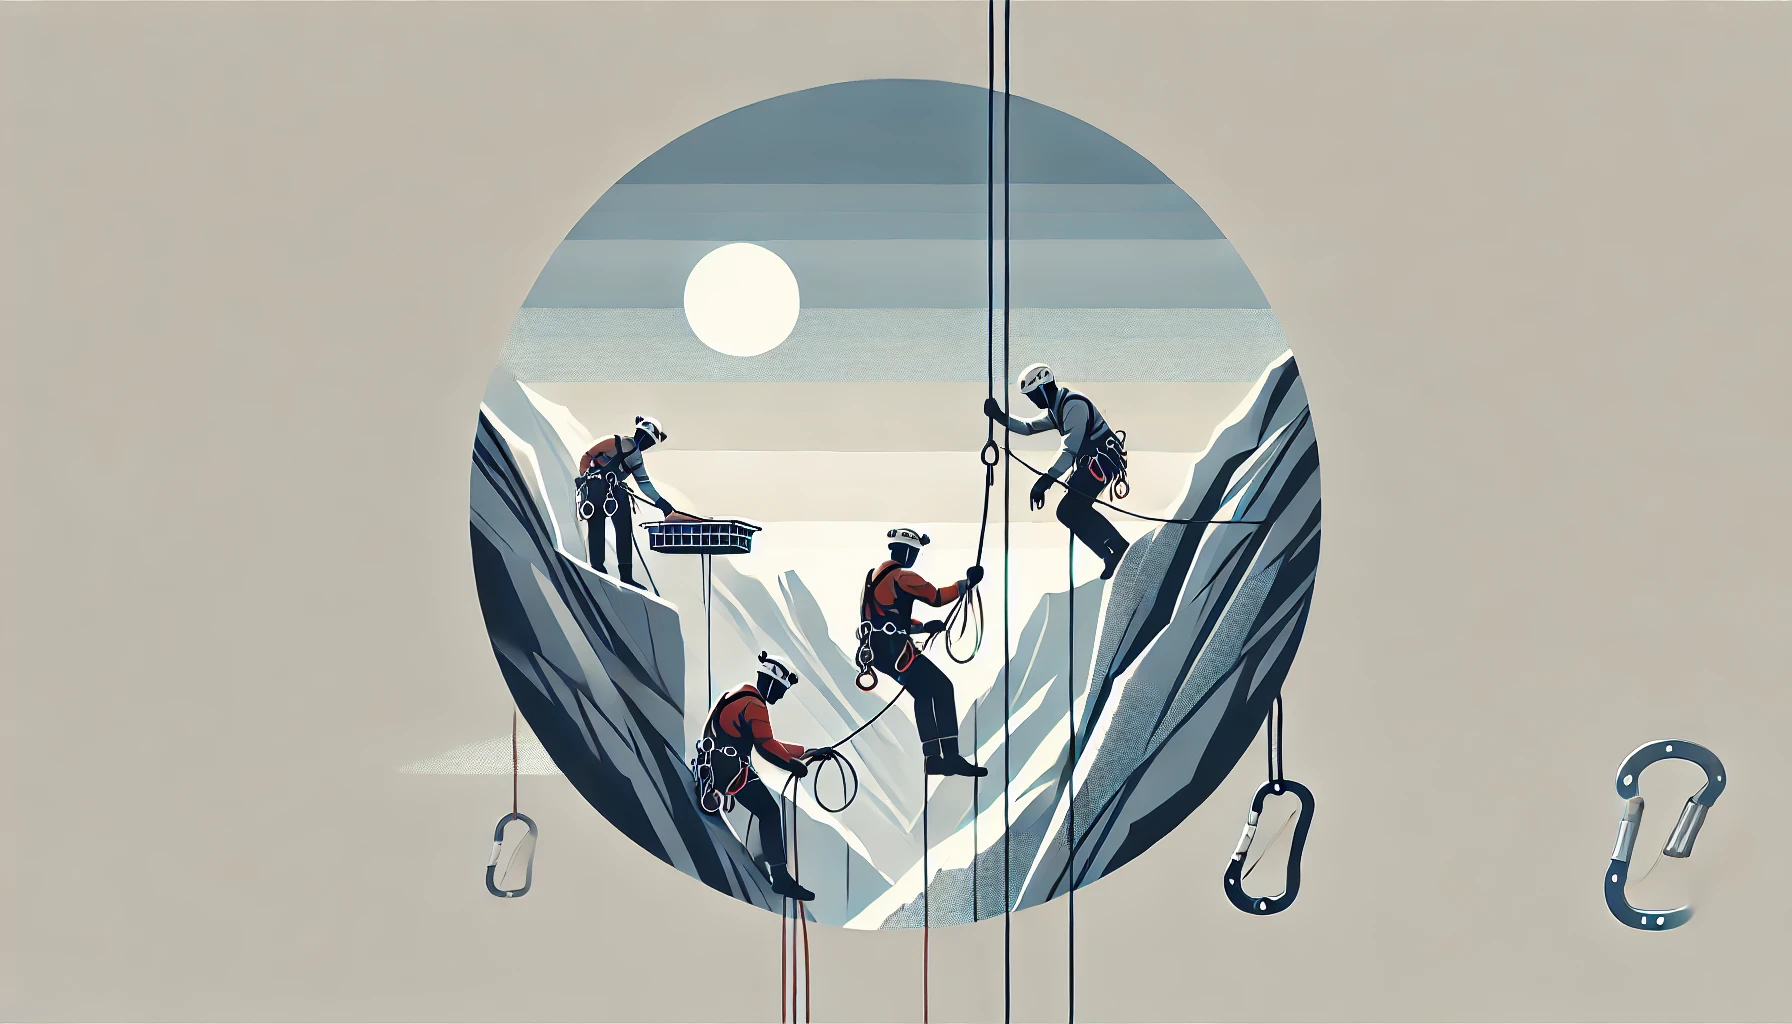
Rescue in high angle and steep slope environment where the use of rope and related equipment is necessary. Rope rescue may also be called Vertical Rescue or in some cases Technical Rope Rescue.
The techniques related to the extrication of victim from High or Low angles using a rope and other associated gear so that the victim can be moved from the hazard, kept stabilized and safe and protected from falling.
1.1 Types of Technical Rope Rescue
- Ascending / Descending
- Rappelling
- Belay
- Hook Ladder
- Tripod / Ladder Method
- Basket Stretcher
- Crevasse crossing
- Swift Water Rescue
- Mountain Rescue
- Climbing
- Vertical caving
- Helicopter Rescue Operation
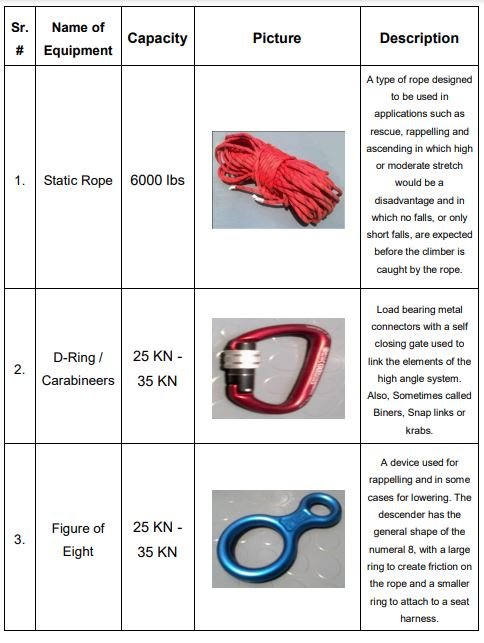
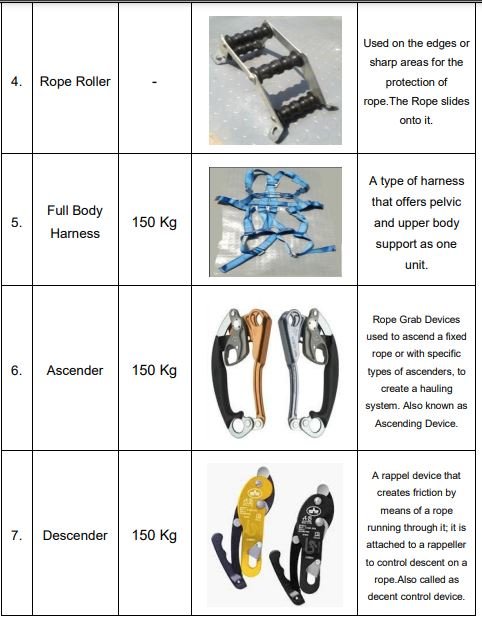
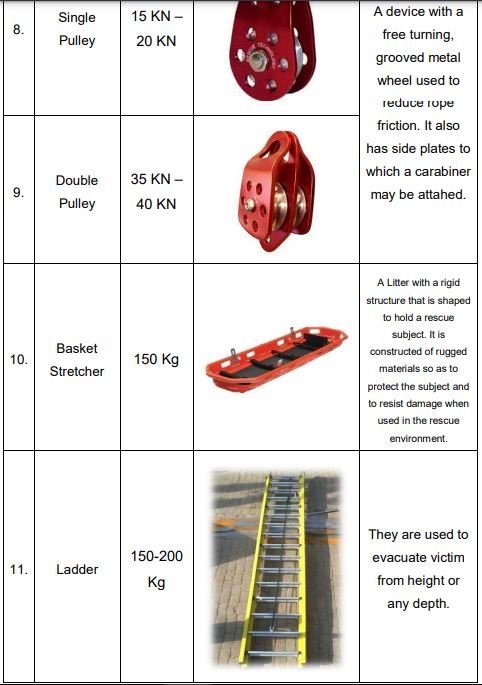
2 Equipment used in Rope Rescue Techniques
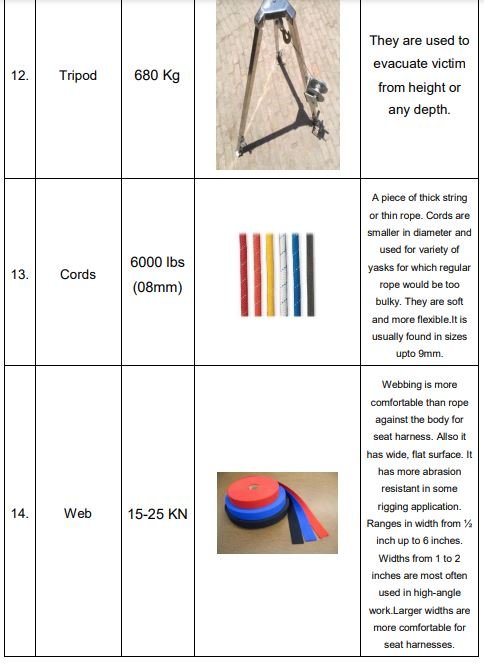
3 Rope Work
The art of tying knots with ropes for the establishment of lines for different rescue operations.
The following are the techniques regarding rope work:
3.1 Belay Technique
The word BELAY comes from the days of sailing vessels. When sailors raised heavy objects, such as sails, they would attach a rope to the object and then take a turn of the rope around the belaying pin to prevent the line from slipping away from them.
To protect against falling by managing an unloaded rope (the belay rope) in a way that secures one or more individuals in case the main line rope or support fails.
A belay rope can be run either way (up or down) while it is being used for a belay. A belay rope does not have weight on it unless a fall occurs on it or tension is called for in special cases.
3.1.1 Belay Signals
The Standard Belay Signals exchanged between a climber (or rappeller) and the belayer to ensure that both are ready:
- Climber: “On belay?” (I am about to climb [or rappel]; are you ready to catch me if I fall?)
- Belayer: “Belay on.” (I am ready to catch you if you fall.)
- Climber: “Climbing (rappelling).” (I am starting to climb [rappel].)
- Belayer: “Climb (rappel) on.” (Go ahead.)
The Exchange To End The Belay initiated by the climber:
- Climber: “Off belay.” (I am in a secure place now. I no longer need the belay.)
- Belayer: “Belay off.” (I am no longer belaying you.)
The “Off Rope” Exchange initiated by the climber and repeated by the belayer:
- Climber: “Off rope.” (I am finished with the rope.)
- Belayer: “Off rope.” (I understand that you are finished with the rope.)
The exchange for when the belayer is Holding The Rope Too Tightly:
- Climber: “Slack.” (There is too much tension on the rope; I cannot move as well as I would like.)
- Belayer: (No verbal response is required, only the action of letting an appropriate amount of slack into the rope.)
The exchange for when there is Too Much Slack In The Rope:
- Climber: “Tension.”
- Belayer: (No verbal response is required, only the action of taking slack out of the rope.)
3.1.2 Equipment for Belay Technique
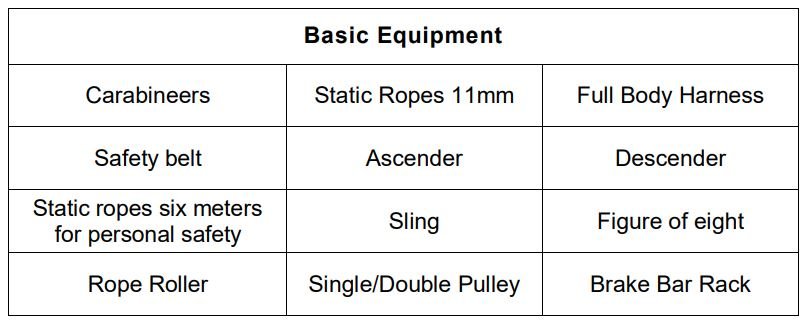
3.1.3 Belay Practice System (Procedure)
- Use PPE (According to scene and as already mentioned in previous lecture of PPE).
- Secure the scene i.e. Cordon Off the area and Hazard removal etc.
- Select and prepare two solid anchors.
- One anchor point will be used for BELAY System.
- Second anchor point will be used for Safety/Guide line.
- Attach the carabineer and figure of eight with an anchor point rope to start belay.
- Wear full body harness and ensure/secure to lock all buckles & extensions.
- Attach one rope through figure of eight and then attach on front of the full body harness.
- Attach 2nd rope (Safety/guide line) inside the carabineer /Single pulley on the back side of the harness.
- Start Belay and Go down (Subject/Climber) smoothly with proper communication.
Note:
Body Belays:
- In a body belay, the belayer creates friction by running the rope around his or her body, usually around the waist.
- Except in emergencies, this technique is not recommended.
3.2 Rappelling Technique
- The controlled descent of a rope using the friction of the rope through a descender as the means of control.
- Normally the friction is created by rope running through a descender.
- Learning safe, controlled rappelling skills is a step toward developing vertical competency.
3.2.1 Types of Rappel
- Using Body Friction

Other types Include:
- Seat Rappel
- Australian Rappel
- Heli Rappel
- Lizard Rappel
3.2.2 Equipment for Rappelling Technique
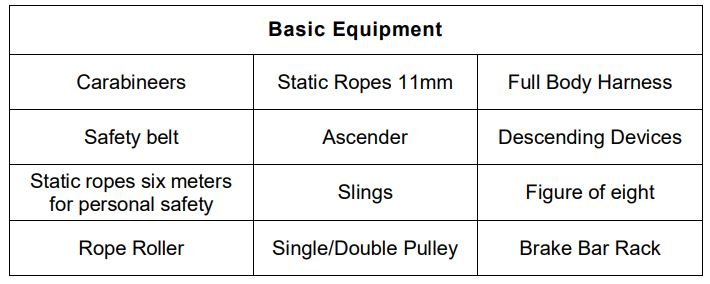
3.2.3 Rappelling Practice System (Procedure)
- Use PPE (According to scene and as already mentioned in previous lecture of PPE).
- Secure the scene i.e. Cordon Off the area and Hazard removal etc.
- Select and prepare two solid anchors.
- Attach Main line with anchor point using Anchor Knots / clove hitch.
- Attach Belay line (Safety/Guide) with Full Body Harness and 2nd anchor.
- Rappel using Descending devices i.e. Carabineer (Munter Hitch), Figure of Eight, Brake Bar Rack, Grigri or ID etc attached with main line.
- Preferably use two mainlines for rappel.
- Start rappel and Go down (Subject/Climber) smoothly with proper communication.
3.3 Ascending / Descending Technique
A means of traveling up a fixed line using either mechanical devices or friction hitches attached with slings to the climber’s body is called as Ascending and the changeover to ascending is called as descending.
An arrangement of two or more ascenders used for travelling up a rope is ascending system. Ascending a rope is, in essence, the opposite of rappelling.
This technique is used when there is no proper access to the building or the accesses are blocked.
3.3.1 Equipment for Ascending / Descending Technique

3.3.2 Ascending / Descending Practice System (Procedure)
- Use PPE (According to scene and as already mentioned in previous lecture of PPE).
- Secure the scene i.e. Cordon Off the area and Hazard removal etc.
- Select a solid anchor point and tie the rope.
- Wear Full Body Harness.
- Attach one ascender with rope and rescuer’s harness.
- Attach second ascender with rope and also with right or left foot of the rescuer.
- Attach the safety/guide line on back side of the rescuer’s harness.
- Attach the descender as per information mentioned on descender for ease of use.
- Second rescuer will tension the rope at the bottom.
- First rescuer will start ascending with proper communication.
- Make proper position for lowering/descending.
- Slightly push the descender lever, the rope will move smoothly and slowly.
3.4 Hook Ladder Technique
- An arrangement of ladder used for travelling externally up with the help of rope.
- This technique is used when the access to any building is blocked or having no access.
- It is usually used on parapet walls, windows or any opening etc.
- It is available in different designs of Hooks.
3.4.1 Equipment for Hook Ladder Technique
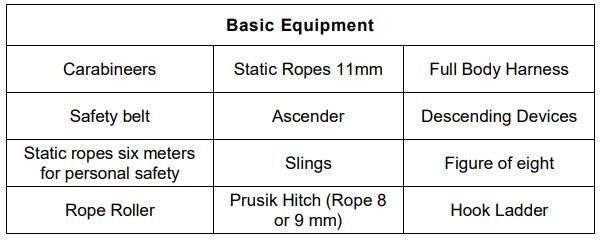
3.4.2 Hook Ladder Signals
- Rescuer One: Hook the Ladder
- Rescuer One: Going Up; Tension the rope
- Rescuer Two: Tension
- Rescuer One: Going Up; Release; Arrived
- Rescuer One: Check Surface; Arrived.
- Rescuer Two: Going Up.
3.4.3 Hook Ladder Practice System (Procedure)
- Use PPE (According to scene and as already mentioned in previous lecture of PPE).
- Secure the scene i.e. Cordon Off the area and Hazard removal etc.
- Attach the ladder with the wall/ window/ opening of the building.
- First rescuer will climb the ladder; securely attached with the rope whose braking control is in the hands of second rescuer.
- Both rescuers will communicate loud enough to each other.
- When first rescuer reaches at certain desirable height; the rescuer will tap 2-3 times to check stability of surface before entering into the floor.
- Second rescuers will repeat the above mentioned steps till he/she reaches to the desired height to conduct rescue operation.
3.5 Basket Stretcher Technique
High angle lowering also called as Ve0rtical lowering. It refers to the controlled lowering of a rescue subject using a rope. If the subject injuries are severe enough, the lowering is done using Basket Stretcher.
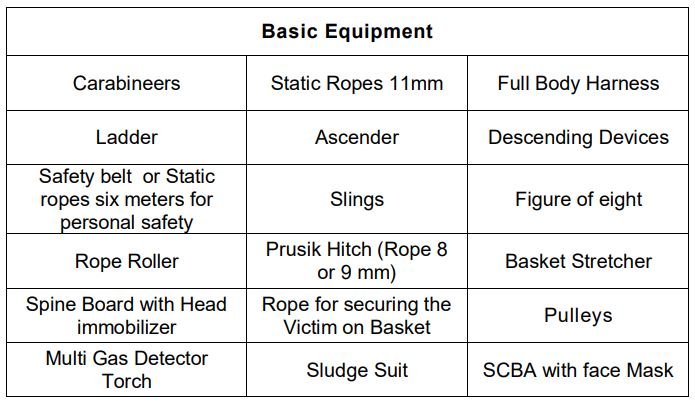
3.5.1 Equipment for Basket Stretcher Technique
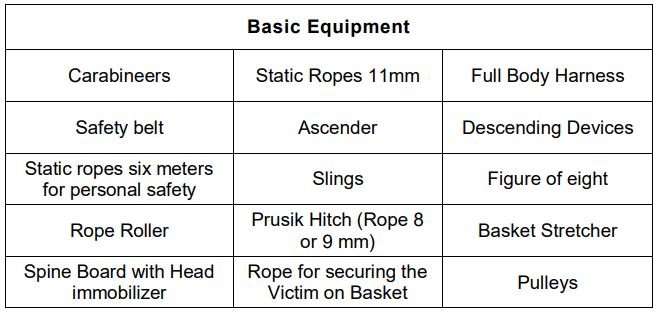
3.5.2 Basket Stretcher Practice System (Procedure)
- Use PPE (According to scene and as already mentioned in previous lecture of PPE).
- Secure the scene i.e. Cordon Off the area and Hazard removal etc.
- Fasten the straps on both sides of basket stretcher with the help of 6 meter static ropes or using Slings.
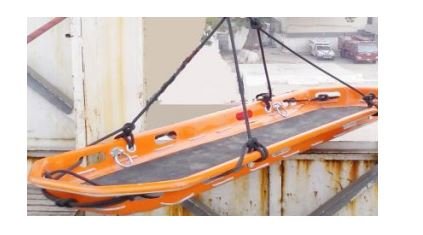
- Tie loop knots on both straps and connect the straps together with the help of five Carabineers.
- The assembly is so made to keep the head side of the basket up.
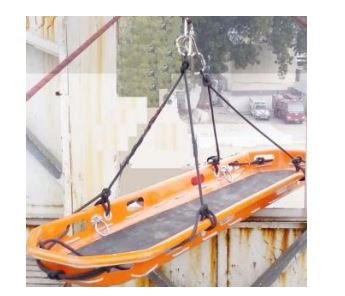
- Select and prepare two anchor points.
- Attach two figures of eight on anchor points with the help of Carabineers.
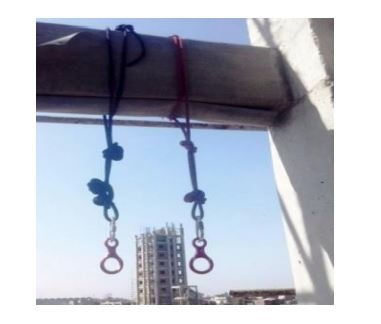
- Attach the main and safety lines through the figure of eight / Descenders and tie loop knots.
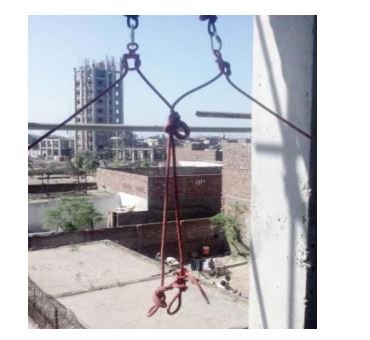
- Secure the patient on spine board and then secure on basket stretcher with the help of 8 meter rope.
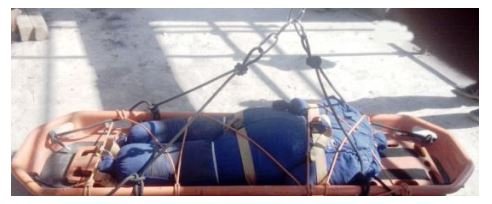
- Attach the Basket with main and safety lines.
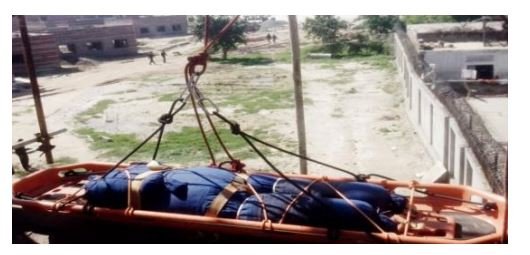
- Connect the both loops of main line and safety line with full body harness of the rescuer. Also, the Basket may be lowered with or without Rescuer.
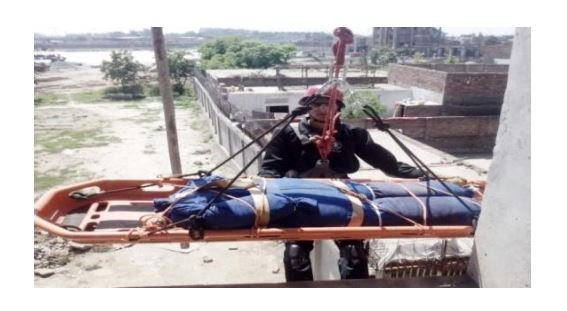
- Tension the main line and safety line to lift the basket stretcher.
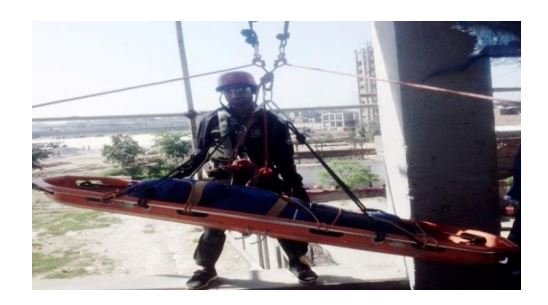
- Rescuer will make proper position by straightening his/her legs and support the basket for smooth lowering.
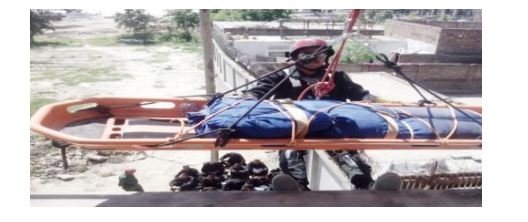
- Release the main line and safety line slowly to lower the victim in basket stretcher & Rescuer.
- Coordination and communication is the life line during operation.

3.6 Depth Rescue Using Tripod and Ladder Technique
This technique is used to evacuate the victim from any depth. This technique will be exhibited wither by using Tripod or Ladder. Using the multiple mechanical advantage system, subject may be rescued.
3.6.1 Equipment for Tripod & Ladder Method
3.6.2 Tripod System
- Mechanical advantage system helps in extricating victim from any depth using a type of artificial three (3) legs frame.
3.6.2.1 Main Parts of Tripod

3.6.2.2 Practice System (Procedure)
- Use PPE (According to scene and as already mentioned in previous lecture of PPE).
- Secure the scene i.e. Cordon Off the area and Hazard removal etc
- Extend the telescopic legs of tripod.
- Attach the securing chain/ rope with legs.
- Three rescuers will support the three (3) legs of tripod.
- Two rescuers will use the gear system.
Basic Rescue Course
Emergency Services Academy Rope Rescue Techniques PWB 20
Rescue 1122
- Recheck the formation of tripod and assess the victim and secure using rope & harness.
- Extricate the victim with proper coordination.
3.6.3 Ladder System
This method is used to evacuate the victim from any depth. Using the multiple mechanical advantage system, subject may be rescued.
3.6.3.1 Practice System (Procedure)
- Use PPE (According to scene and as already mentioned in previous lecture of PPE).
- Secure the scene i.e. Cordon Off the area and Hazard removal etc
- Select proper footing for ladder and select two solid anchor points.
- Make two anchor points. Each on 2nd last rung of the ladder.
- Use 6m static rope (11mm) to construct anchors on the 2nd last rung on both sides of the ladder using clove hitch.
- Attach double pulleys on each anchor and pass the rope.
- Secure the ladder with anchoring pickets using two ropes so as to erect the ladder at an angle in between 60-70 degree angle.
- Check the hazards before entering.
- Go down smoothly with proper communication.
- Figure of eight or prussic knot can be used to enhance the smooth descent.
- Two rescuers will secure from right and left side of the ladder during ascending & descending.
- The victim will be secured and taken out first.
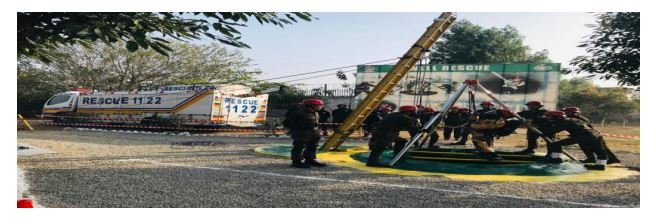
3.6.3.2 Communication Signals
- Release the rope
- Tension the Rope
4. Important Safety Reminders
The following guidelines can help ensure the safety of those participating in the rescue operation; these include:
- Always ensure PPE (As mentioned in Previous Chapter and as per incident hazards, environments and tasks/situations)
- Always secure the scene.
- Do not rush! Maintain a sense of “controlled urgency”.
- Establish a well marked safety perimeter.
- Ensure that rescuers are tied in when working within 10 feet (3m) of an exposed edge.
- Use standard communications terminology and techniques.
- Loud & Clear communication is the life line both for rescuer and victim.
- Danger zone must be marked.
- Always secure ones safety using safety belt or rope with bowline knot.
- Ensure loose gear in a cache adjacent to the rescue operations area.
- Make sure rescuers are prepared for contingencies.
- Always check the rope before use.
- Don’t abuse the ropes.
- Keep fingers, hairs & clothing free of rope.
- Additional safety line must be used along with the main line.
- Ensure all equipment is in working condition.
- Ensure all Equipment are properly locked and correctly used.
- Select solid anchor points.
- In case of multiple anchors, try to keep anchor points close to each other.
- During Lowering / Ascending of Basket Stretcher; one should not stand at the bottom.
- Lowering or ascending will be exhibited smoothly.
- Follow the commands of the Incident commander.
- Always learn under the guidance of qualified, experienced instructors.
- Check and reconfirm safety before start of any activity.
Caution:
Safety Considerations
Remember your priorities for Operational Safety:
- You are NUMBER ONE!
- Your fellow rescuers are your SECOND concern.
- The subject is your THIRD priority.
Safety is a paramount importance at all times. If you see any action that is unsafe, your responsibility is to Speak Up!
Remember that no one is infallible, including you. The worst case scenario is saving a rescuer injured, resulting in two patients. Plan and execute a safe response so that you do not create an incident within an incident.
Attention:
Train your skills with experienced people (instructors). If you are not sure, do not you’re your life. No video can replace the personal exchange between you and good teachers.
DIRTY DOZEN OF HUMAN ERRORS
- Lack of communication
- A Failure to exchange information.
- Complacency
- Loss of awareness and development of overconfidence.
- Lack of knowledge
- Lack of experience or training in the task.
- Distraction
- Anything that takes your mind off the job.
- Lack of Teamwork
- Individuals involved in a similar task; without teamwork.
- Fatigue
- Considered to be the number one contributor to human error.
- Lack of Resources
- Insufficient or not fully operational equipment and man power to safely perform a task.
- Pressure
- External and self imposed psychological pressure.
- Lack of Assertiveness
- Failing to speak up when things do not seem right.
- Stress
- Being overwhelmed by stress leads to human error.
- Lack of Awareness
- A lack of alertness and vigilance in observing; failing to ask the “what if?” question.
- Norms
- The “Normal” accepted way things actually are done in an organization, regardless of whether their practices are valid and safe.

Emma Lee, an expert in fire safety with years of firefighting and Rescuer experience, writes to educate on arescuer.com, sharing life-saving tips and insights.
